The Story of Limits

Limits by Money Master is designed to help families track, and communicate about spending.iPhone-Dark-1-MainScreen

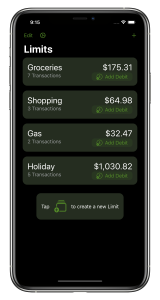
That’s the tag line, anyway, and it’s almost 100% true — the only thing that’s not quite right is that it’s actually designed to help my family track, and communication about spending.

Despite all the tracking tools that we have available to us these days, it’s still hard to keep track of expenses, and to communicate all the small, subtle changes to our spouse, or anyone else in our family that needs to know.  My family has tried to go all cash several times, but it’s never stuck.  We’ve tried to keep a spreadsheet, and use our bank account to reconcile it every night, but mistakes were made.  We’ve tried just “not spending money”, but that’s not realistic, especially when we need to eat, which — as it turns out — is fairly often.

Much of that can be blamed on us – call it a lack of discipline if you want – but I think more importantly was a lack of structure, and a lack of shared accountability.  We had implied roles – I was the planner, my wife was the spender, and as much as I tried to let her know when we were getting low on our weekly or bi-weekly budget, it was hard to know when to even look.  Likewise, if she ended up going to the grocery store, and, say, Target on the same afternoon, we could easily spend $400+ in a matter of two hours.  This wasn’t a matter of overspending – it was a matter of too much to keep in our heads, and too much to synchronize between us. We needed something different.

Just an aside – this isn’t for lack of income.  We’re both employed, and have been for 99% of our adult lives.  We are fortunate to have not really suffered, and our kids (nor us) certainly don’t know what it means to really be hungry.  In other words, this is something we could – and needed to – control with what we already had.

I narrowed in on three focus areas that Limits had to excel in:

  • Fostering communication
  • Fast, accurate record keeping, and
  • Forming strong habits.

Communication

The single most important thing that Limits is intended to communicate is how much you have available to spend.  This can come in many forms, of course – do you have one bucket of ‘Spending’ that everything comes from?  Do you keep a separate budget for Groceries, Gas, Fun Money, etc?  Do you have a ‘Shared Spending’, a ‘My Spending’ and a ‘Your Spending’?  Limits needs to be good at all of this, because every family will want to track this differently – in fact, my family is very likely to track this differently over time.

iPhone-Light-2-DetailScreenThis is why the first thing you see when you open Limits are these top level numbers — so you can know how much you have left to spend in any of your Limits within seconds.  It’s also the key to helping families communicate about spending money.

Each time a family member adds a Debit to Limits, it immediately syncs that transaction to Apple’s iCloud servers.  Once it’s there, a notification will be sent to every device that has access to that Limit – that includes your own devices (an iPhone and an iPad, for example), and if you’ve shared the Limit with anyone, it also includes all of their devices.  All of this happens seamlessly, and it means that everyone can answer the question of “How much do we have available to spend” whenever they need it.

But I’ve found that there’s more to it than that – I’ve found that this means of communication actually improves our understanding of this number.  Prior to Limits, we might discuss the budget in passing before leaving for work in the morning, but it might not fully sink in, or we might even get two numbers mixed up.  Now all I need to say is “I updated Limits”, and my wife can take a look in her own time, when she’s able to focus on it.  It has been much more effective!

Fast, Accurate Record Keeping

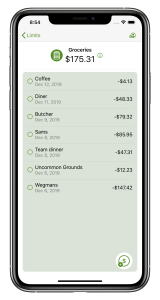
Keeping to your budget is only as good as your record keeping, and staying disciplined enough to track your spending accurately is not easy.  This will likely be one of the most active areas of growth for Limits, and at launch, it already supports a few options.

It was important to be able to add a debit with as few taps as possible, and you can get to the Add Debit screen with a grand total of one click from just about anywhere in the app.  As Limits grows, though, I actually hope this method of entering transactions becomes the least used.iPad-Light-5-Info

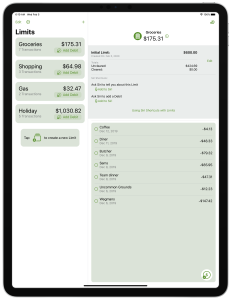
Limits was designed from the very beginning to have very flexible data entry, and the first of the ‘alternate’ methods is to use Siri – and it’s one of my favorite parts of the app.  For all the criticism Siri gets, it has become a powerful tool for developers to open simple, quick interactions for users.  Does it get any simpler than just saying “Hey Siri, Got Groceries”, and have Siri ask how much you spent?  This is one of those details that’s not only simple, but adds a bit of delight to the app (it still delights me!)

That ‘delight’ element is one of the important ways that I’m attempting to help users keep accurate records – if a simple interaction has a ‘cool’ factor, then it’s more likely that you’ll do it.  Siri isn’t for everyone, though and there will be more to come.  First, though, we need to think a bit more about…

Forming Strong Habits

Habits are the kind of small decisions that you make every day, often without even thinking about it.  Finding a way to convert a beneficial ‘task’ to a ‘habit’ is one of the most powerful ways for you to find success.

One of the best ways to form good habits is to share accountability, and that’s one of the things that Limits is designed for.  Having the ability to instantly share spending with my wife, and to see ‘where we are’ in our spending, helps us keep each other accountable, even without thinking about it.  Every time my wife mentions she’s going to try to get to the store, I take a quick look at Limits to make sure I’ve updated it.  Likewise, when I mention I’m going to look at ‘budget stuff’, my wife takes a moment to make sure everything is up to date.  These nearly unspoken moments are helping us each to form better habits in our own way.

But there’s much more to come here, including location and time of day reminders, stronger planning features, with scheduled, recurring activities – features like will come over time, and make Limits even more effective at helping you to form strong habits!

A Word About ‘Automating’ Your Finances

‘Automating’ your finances is about making certain things happen automatically, and it can be a powerful way to save money and get your bills paid, but I do feel strongly that there’s a danger of automating away your attention to finances.  We have parts of our paychecks put into a savings account, we have some of my bills on autopay, and we have a 401K for long-term savings – these things work great, and honestly wouldn’t happen if we had to decide to do them every month, but there are a few things we don’t like to do.

Putting bills on autopay, for example, has worked great for ‘fixed’ bills — those that are the same amount every month.  It means that these payments always happen, even if we forget, but we still record and track these bills in Bill Organizer by Money Master, so we know that that money will disappear from our account on a certain day.

‘Variable’ bills, though, like utilities, are paid manually.  Every month, when we get the bill (via email mostly, thank goodness!), I make a quick record in Bill Organizer.  This way at the beginning of a week or pay period, all I have to do is take the expected income, subtract the bills and automatic savings, and this is our spending money for the week.  Generally speaking, this takes seconds, and if one of those bills a bit higher than expected (electricity bill in the winter and summer, I’m looking at you!), it gives us time to figure out how we want to handle it.

Limits exists – to be quite frank – because we decided that we couldn’t delegate the tracking of our day to day spending to our bank any longer.  Would I rather be able to just look at my bank account’s website or app, and know exactly where we are for the month?  Yeah, of course – but the reality is that every week, there’s at least one purchase that takes a few days to show up.  About two month into the development of Limits, I actually had a transaction show up in my bank that I had made over a month earlier.  This was not a write-a-check-for-a-once-per-year-bill-and-send-it-via-snail-mail type of expense – it was a trip to a burrito shop that I took with co-workers!  It was small, and didn’t bother us – I had recorded this purchase on a very early build of Limits, so I knew it was coming at some point – but I was certainly vindicated that building Limits was the right thing to do!

How Can Limits Help Your Family?

Enough about me – Limits is already helping my family to track spending, and to get ourselves on the same page.  How can it help your family?  If your family doesn’t actively budget and talk about spending money every month, I can guarantee that you could benefit by starting to do so, and I hope you do – even if you don’t think that Limits is the right choice for you.  If you do decide to give Limits a try – Thanks!  Limits is still growing, and I’d love to hear your thoughts on how it could improve – we’re always listening!

Preorder now, on the App Store!


Limits and SwiftUI – Custom Currency Button

Limits by Money Master is a personal finance app, so currency symbols are an obvious part of any design.  Early on in the UI design for Limits, I decided that I wanted a currency button with a badged ‘plus’ in the corner, to represent a button to add a Debit.  The problem, of course, is that currencies vary all over the world, and it needed to be the currency of the current Locale of the phone, or else I would risk alienating my users immediately.

The great SF Symbols package has several currency-based glyphs, however it didn’t appear that it would be a great fit for a few reasons:

  1. They aren’t organized or named by Locale, so I would need to manually map every possible Locale to a glyph
  2. Each of the glyphs are in either a filled or empty circle, and none of them are badged – I felt the ‘plus’ sign was important to convey the intended meaning

SwiftUI’s Button view is extremely customizable – the ‘view’ of a Button can be more than just a Text label and an Image, but it can be any SwiftUI view.  Perfect for a building a custom control that would be sensitive to taps.

The Finished View

Before we break down how to build the view, let’s start with the finished product:

Screen Shot 2020-02-17 at 11.47.27 AM

This is, of course, 8 different representations of the Button, each in a different Locale:

  • en_US
  • en_GB
  • fr_CH
  • ro_RO
  • cs_CS
  • zh_CN
  • ar_AE
  • ms_MY

This selection of Locales is intended to show both that a variety of common currency symbols look good, but also that symbols with multiple characters will scale appropriately.

Breaking this down further, it is built in three parts — the outlined circle, the ‘plus’ badge, and the currency symbol.  Let’s take them one at a time.

The Circle

Calling it a circle isn’t quite accurate.  The space behind the badge isn’t actually drawn, because the badge is actually transparent – the circle would show in the negative space of the plus sign if it were.  Instead, it’s an arc, drawn using a Path:

GeometryReader { geometry in
    Path { path in
        path.addArc(
            center: CGPoint(x: self.halfHeight(geometry), y: self.halfHeight(geometry)),
            radius: self.halfHeight(geometry) - self.strokeWidth(geometry),, 
            startAngle: .degrees(120),
            endAngle: .degrees(160),
            clockwise: true)
    }.stroke(lineWidth: self.strokeWidth(geometry))
}
...

func halfHeight(_ geometry: GeometryProxy) -> CGFloat {
    geometry.size.height * 0.5
}

func strokeWidth(_ geometry: GeometryProxy) -> CGFloat {
    geometry.size.height * 0.06
}

This simple Path draws an arc around the center point of the component, with the radius filling out the space nearly from end to end.

The Badge

I did end up making use of the SF Symbols package — the badge itself is one of the available images:

Image(systemName: "plus.circle.fill")
    .resizable()
    .frame(width: self.badgeHeight(geometry), height: self.badgeHeight(geometry))
    .offset(x: self.badgeOffset(geometry) * -1, y: self.badgeOffset(geometry))
...

func badgeHeight(_ geometry: GeometryProxy) -> CGFloat {
    geometry.size.height * 0.4
}

func badgeOffset(_ geometry: GeometryProxy) -> CGFloat {
    halfHeight(geometry) - (badgeHeight(geometry) * 0.5)
}

The glyphs that make up the SF Symbols package makes the process of finding icons for your app simple – it saved me hours of hunting down freely available to use glyphs, and sizing them appropriately, but they can also be handy when composing Views.  The frame and offset here is to size the badge, and move it to the lower left corner of the view, over the gap in the circle.

One more interesting note here – this is actually inside the same GeometryReader shown above, and sizing the badge relative to that enclosing container allows the view to scale up and down smoothly, rendering appropriately at any size.

The Currency Symbol

Finally, we draw the currency symbol in the center of the view:

@State
var locale = Locale.current
...

Text(self.currencySymbol())
    .font(Font.system(size: self.currencySize(geometry), weight: .semibold))
...

func currencySymbol() -> String {
    self.locale.currencySymbol ?? "$"
}    

func currencySize(_ geometry: GeometryProxy) -> CGFloat {
    var modifier: CGFloat = 0.25
    if currencySymbol().count == 2 {
        modifier = 0.33
    } else if currencySymbol().count == 1 {
        modifier = 0.5
    }
    return geometry.size.height * modifier
}

Again, this is enclosed in the GeometryReader, so it scales up and down appropriately.  The locale variable is constructed as a @State in this case for testing – it is never varied in the app, but can be set to any value in Previews.  This is how I created the various previews, above.

Finally, the currencySize method varies the font size, allowing those 2 and 3 character symbols to be drawn smaller, to fit properly.

Putting it all together

Each of those three components are further combined inside a ZStack, so they’re drawn on top of each other, forming the final component.

A few final points before showing the entire code:

  • There is an optional label drawn on the Main Screen of Limits, showing the text ‘Add Debit’ to the right of the button.  This is controlled by changing the value of the showLabel property
  • By default, the size of the component will be 50×50, but can be adjusted up or down with the size property
  • Of course, pressing the button needs to actually do something – in this case, it will open a Sheet showing the Add Debit/Credit View, which is attached directly to the button itself.  Attaching the sheet directly to the button is a simple way ensure the button behaves the same way, no matter where it’s placed in the app!
struct NewItemButton: View {
    @State
    var showItemSheet = false
    
    @State
    var showLabel = false
    
    @State
    var size: CGFloat = 50
    
    @State
    var locale = Locale.current
    
    var body: some View {
        Button(action: {
            self.showItemSheet = true
        }) {
            HStack {
                GeometryReader { geometry in
                    ZStack {
                        //Draw the Circle
                        Path { path in
                            path.addArc(
                                center: CGPoint(x: self.halfHeight(geometry), y: self.halfHeight(geometry)),
                                radius: self.halfHeight(geometry) - self.strokeWidth(geometry),
                                startAngle: .degrees(120),
                                endAngle: .degrees(160),
                                clockwise: true)
                        }.stroke(lineWidth: self.strokeWidth(geometry))
                        
                        //Draw the Badge
                        Image(systemName: "plus.circle.fill")
                            .resizable()
                            .frame(width: self.badgeHeight(geometry), height: self.badgeHeight(geometry))
                            .offset(x: self.badgeOffset(geometry) * -1, y: self.badgeOffset(geometry))
                        
                        //Draw the Currency Symbol
                        Text(self.currencySymbol())
                            .font(Font.system(size: self.currencySize(geometry), weight: .semibold))
                    }
                }.frame(width: size, height: size)
                
                //Optionally show the Label
                if showLabel {
                    Text("Add Debit")
                }
            }
        }.sheet(isPresented: $showItemSheet) {
            Text("A Form Would Go Here!")
        }
    }
    
    func currencySymbol() -> String {
        self.locale.currencySymbol ?? "$"
    }
    
    func currencySize(_ geometry: GeometryProxy) -> CGFloat {
        var modifier: CGFloat = 0.25
        if currencySymbol().count == 2 {
            modifier = 0.33
        } else if currencySymbol().count == 1 {
            modifier = 0.5
        }
        return geometry.size.height * modifier
    }
    
   func halfHeight(_ geometry: GeometryProxy) -> CGFloat {
        geometry.size.height * 0.5
    }
    
    func strokeWidth(_ geometry: GeometryProxy) -> CGFloat {
        geometry.size.height * 0.06
    }
    
    func badgeHeight(_ geometry: GeometryProxy) -> CGFloat {
        geometry.size.height * 0.4
    }
    
    func badgeOffset(_ geometry: GeometryProxy) -> CGFloat {
        halfHeight(geometry) - (badgeHeight(geometry) * 0.5)
    }
}

And that’s it!  SwiftUI makes a relatively complex component very straight forward to build – had I doing this in UIKit, it’s likely I would not have attempted this, as the drawing API simply is not accessible as it is SwiftUI, and the ability to compose a view is not as simple.  It’s a big win!

Core Data + CloudKit – Syncing Existing Data

Anyone who has an app that uses both Core Data and CloudKit to sync the data across devices will understand why NSPersistentCloudKitContainer just might be a sleeper hit of iOS 13.  For Money Master, I was able to remove almost 1000 lines of my most complex code, and I have more reliable sync as a result!  It’s not all roses, though – if you already have users with data in the field, you may have noticed that the data isn’t pushed to the new CloudKit Zone, while new data is – this is apparently an intentional design choice, although Apple doesn’t provide any guidance, nor do the new API’s make it obvious how this should be done.  With a little experimentation, I’ve found that the following solution seems to be a way forward.

Duplication, Duplication, Duplic…

My first pass, suggested by Apple, was to simply change my NSPersistentContainer to NSPersistentCloudKitContainer.  This allowed new data to sync over, but the existing data didn’t go anywhere – if I modified any of the existing records, however, those sync’d just fine.  Sweet – just do this to all records on the first start, and we’ll be good to go!  Sadly, my joy was short lived, as this caused a full copy of the data to be synced for each device – not so good…

Taking a step back, this makes sense – when I built iCloud support into Money Master, I had the exact same problem.  I needed to implement deduplication myself, by adding a unique UUID to each record.  Core Data, of course, knows about this property, but it has no idea what it’s used for.  Each device essentially has a separate, independent database, that just happens to have the same data in each – the deduplication logic is implemented in my code!

It would have been awesome for Apple to provide a way to mark a property on each record to use as the CKRecord ID – seems to me that this would have been an elegant solution, but alas, it’s not available.

A Tale of Two Persistent Containers

Instead of modifying my existing Persistence Container, I decided to create a second one – this would allow me to use the original container to store certain configuration data that was best left on device, while also allowing me to pick and chose what records I copied into the new container.  My Core Data Stack looks something like this:

//Original Local Container
lazy var localContainer: NSPersistentContainer = {
  let container = NSPersistentContainer(name: "MyCoreDataModel")
  container.loadPeristentStores(completionHandler: { (storeDescription, error) in 
    if let error = error as NSError? {
      fatalError("Unresolved error \(error), \(error.userInfo)")
    }
  })
}()

//New Mirrored Container
lazy var mirroredContainer: NSPersistentCloudKitContainer = {
  let container = NSPersistentCloudKitContainer(name: "MyCoreDataModel")
  let storeDirectory = FileManager.default.urls(for: .applicationSupportDirectory, in: .userDomainMask).first!

  let cloudStoreLocation = storeDirectory.appendingPathComponent("MirredData.sqlite")
  let cloudStoreDescription = NSPersistentStoreDescription(url: cloudStoreLocation)

  //"Cloud" is the name of a second configuration in my Core Data Model
  cloudStoreDescription.configuration = "Cloud"

  // Set the container options on the cloud store
  cloudStoreDescription.cloudKitContainerOptions = NSPersistentCloudKitContainerOptions(containerIdentifier: "iCloud.")
  
  container.persistentStoreDescriptions = [
    cloudStoreDescription
  ]
  container.loadPersistentStores { (storeDescription, error) in 
    guard error == nil else {
      fatalError("Could not load persistent stores \(error!)")
    }
  }
}()

And what about those dupes?

Of course, that deduplication UUID is still there, so why not give it a second life?  But how do we know what data is where?  The new NSPersistentCloudKitContainer is designed as an ‘eventually consistent’ distributed system, and as such, it doesn’t provide a way to ask it if you have all of the data.  After many (many!) different attempts, I realized the answer was much simpler than adapting the new API to a use it’s not designed for — CloudKit itself hasn’t gone away, and can be used to inspect the new containers!

From here, the way forward was fairly simple – load the data from CloudKit (in batches, if you need), and load data from the same batch from my original PersistenceContainer.  For every local record, if there is no associated record with the same UUID from CloudKit, that means it hasn’t been sync’d, and I can store that same record in my new and improved Mirrored Persistent Container — if it does have a match, I can leave it where it is.  And there we have deduplication!

func migrate() {
  let privateDB = CKContainer.default().privateCloudDatabase
  let query = CKQuery(recordType: "CD_RecordName", predicate: NSPredicate(value: true)) //Core Data appends 'CD_' to the name
  let zoneId = CKRecordZone.ID(zoneName: "com.apple.coredata.cloudkit.zone", ownerName: CKCurrentUserDefaultName) //Yep, Core Data creates it's own CloudKit Zone

  privateDB.perform(query, inZoneWith: zoneId, completionHandler: { (cloudRecords, error) in 
    if let error = error {
      ....
    }

    var cloudUUIDs = cloudRecords.map { record in 
      return UUID(uuidString: record["CD_uuid"]!.description)! //Another 'CD_' prefix...
    }

    let localContainer = CoreDataStack.instance.localContainer
    let fetchRequest = NSFetchRequest(entityName: "RecordName") //Same as 'CD_RecordName' above, but without the 'CD_'

    let context = localContainer.newBackgroundContext()
    context.performAndWait {
      do {
        let records = try context.fetch(fetchRequest) as! [RecordName]

        records.forEach { record in 
          if cloudUUID.filter { $0 == record.uuid }.count == 0 {
            recordRepository.create(record) //This has been updated to use the Mirrored Persistent Context
          }
        }
      } catch {
        fatalError("blah, blah, blah...")
      }
    }
  }
}

Your Mileage May Vary

A few random points:

  • Make sure you only run this migration once – I use UserPreferences to track this sort of thing, and I only mark it as ‘complete’ if it failed without a network error
  • In order to query the new records in CloudKit, you’ll need to pre-create the ‘CD_RecordName’ type in CloudKit, and assign a Queryable Index on the recordName property.  This is standard procedure for any CloudKit record, if not a bit annoying.  Luckily, you don’t need to add any other properties on it — Core Data will handle the rest.
  • I used pseudo-code here because my migration may not be applicable across the board.  In Money Master it’s likely that you’ll have up to a few hundred records — if your app has thousands, you’ll need to be much more careful about the data you’re copying down to the devices.

One More Thing…?

One last tip — if your previous CloudKit integration had a CKSubscription created named ‘cloud’… well, that’s going to cause some problems.  You’ll get errors from the Core Data infrastructure, and you won’t see any data sync’d to the new iCloud Zone.  The solution to this is simple, just delete the existing subscription before creating the NSPersistentCloudKitContainer.  It just seems like Apple could have chosen a subscription name here that’s slightly less likely to have this kind of collision…